Giới thiệu
Trong bài viết trước về react-router, tôi có giới thiệu sơ qua về react-router, tuy nhiên nội đó đã khá cũ, và react-router cũng đã có nhiều thay đổi. Sau bài viết giới thiệu việc dùng Material UI Component để tạo Web App, tôi muốn thêm phần routing vào Web App đó để nó được hoàn chỉnh hơn và nhân đó tôi muốn thêm về react-router mới và kết hợp nó với MUI để tạo một Web App.Server side and Client side Routing
Trước khi đi vào vấn đề chính tôi cũng muốn giới thiệu sơ qua về cách routing giữa server side và client side.Server Side Routting
Mô hình server side routing: khi có request từ Client thì phía server sẽ có bộ Router để nhận request đó, và tương ứng với route hay path từ client mà Server sẽ render nội dung Page tương ứng.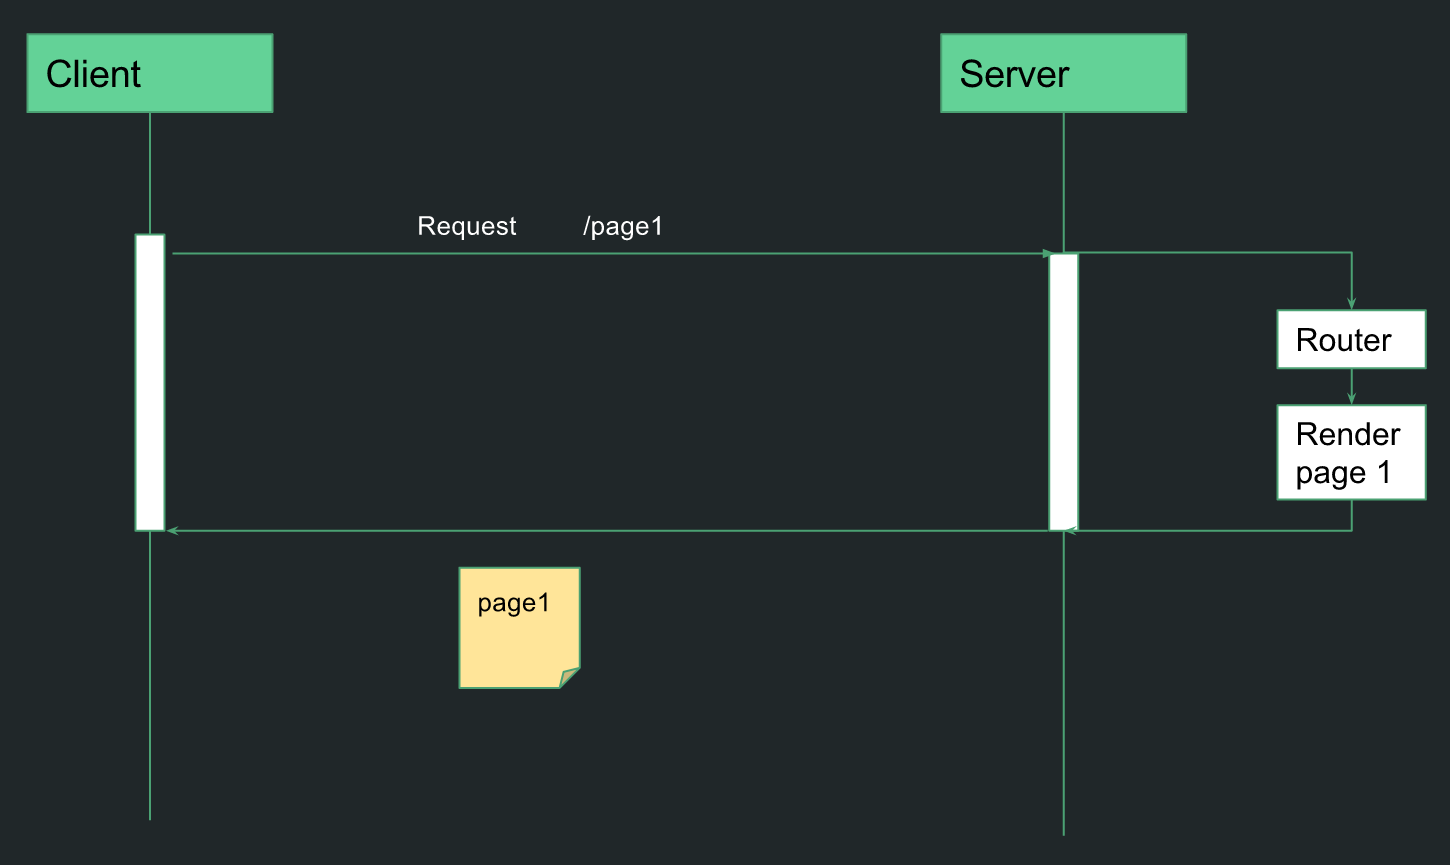
Client Side Routting
Mô hình client side routing: bộ Router và Render sẽ không nằm ở phía server mà sẽ do phía Client đảm nhận. Trong URL chuyển trang, sẽ có ký hiệu hashtag # để browser không chuyển request này xuống server mà chỉ xử lý ở phía Client thôi.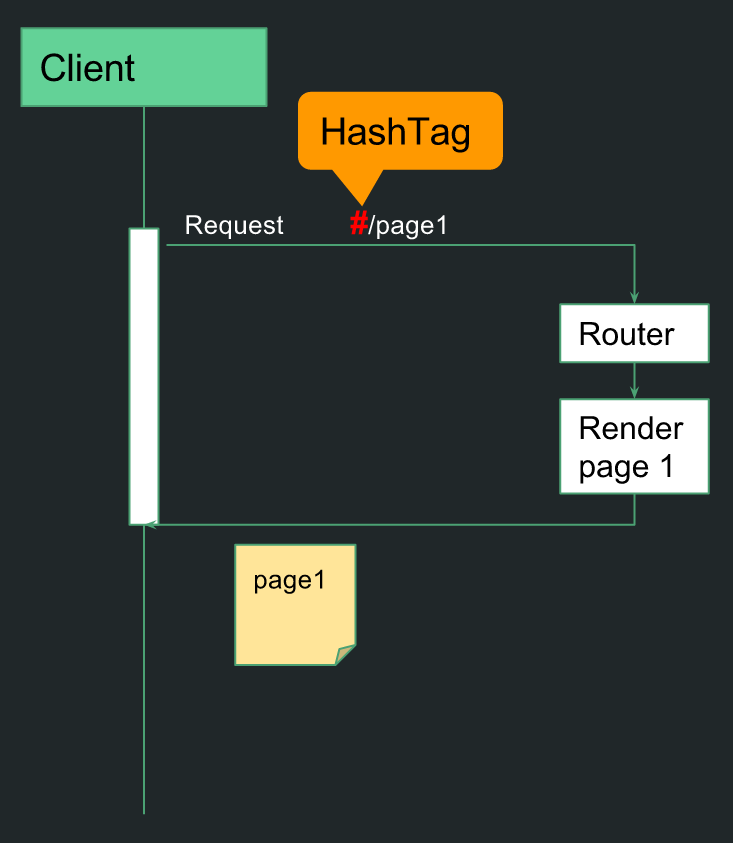
React-router
React-Router là một thư việc của React, giúp các React App có thể routing ở phía client.Bên dưới là lời giới thiệu từ HP của react-router:
“React Router is a complete routing library for React.
React Router keeps your UI in sync with the URL. It has a simple API with powerful features like lazy code loading, dynamic route matching, and location transition handling built right in. Make the URL your first thought, not an after-thought.”
Trong phạm vi bài viết này tôi chỉ giới thiệu cách dùng cơ bản nhất của react-router như render 1 route, nest các route mà không giới thiệu các nội dung khác. Các nội dung khác của react-router, bạn có thể tham khảo thêm tại:
https://github.com/reactjs/react-router-tutorial/tree/master/lessons
3 Components chính của React Router:
- Router
- Route
- Link

Cơ bản, component Link dùng để dẫn hướng trang (component) cần trỏ đến, Route là component kết nối giữa path và component tương ứng với path đó, còn Router thì wrap tất cả các Route con.
Sample
Chúng ta thử tạo 2 sample, một là chỉ đơn thuần là render 1 route tương ứng với 1 URL, hai là lồng các route con trong 1 route cha (nested route)Simple Route
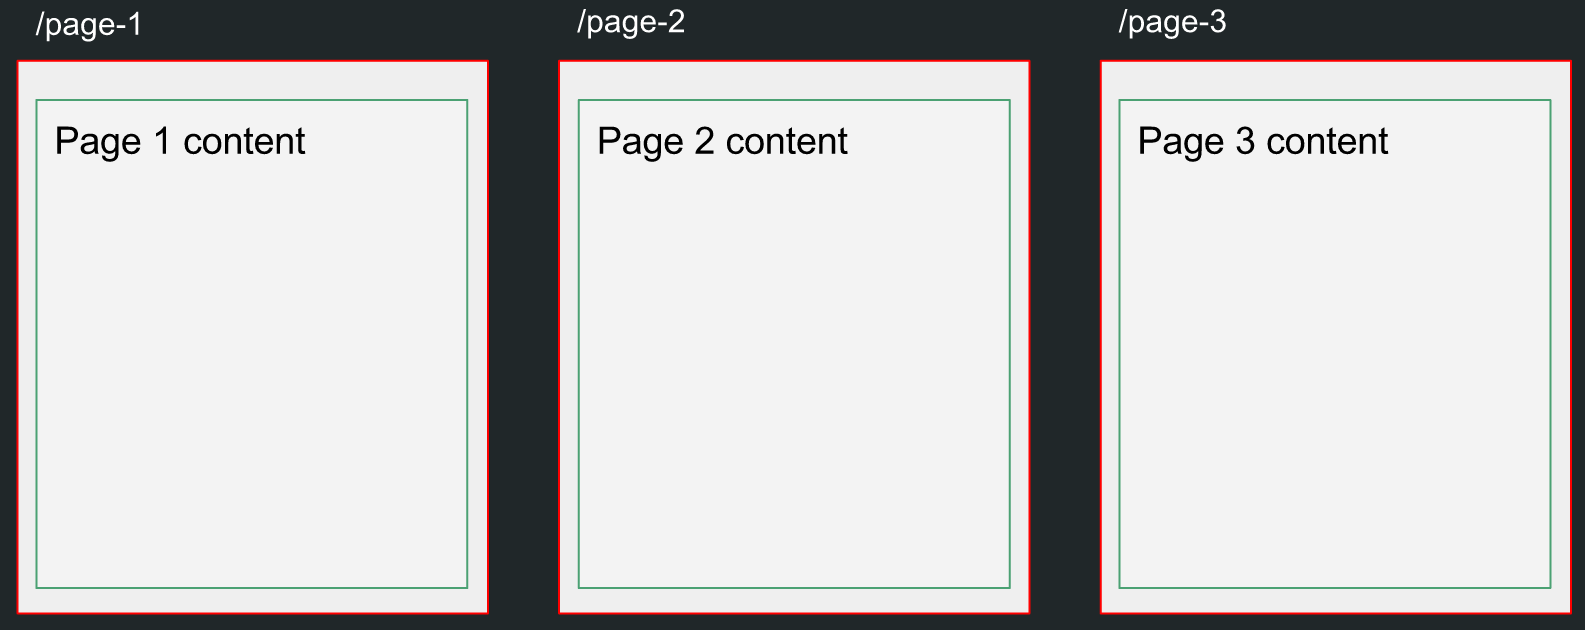
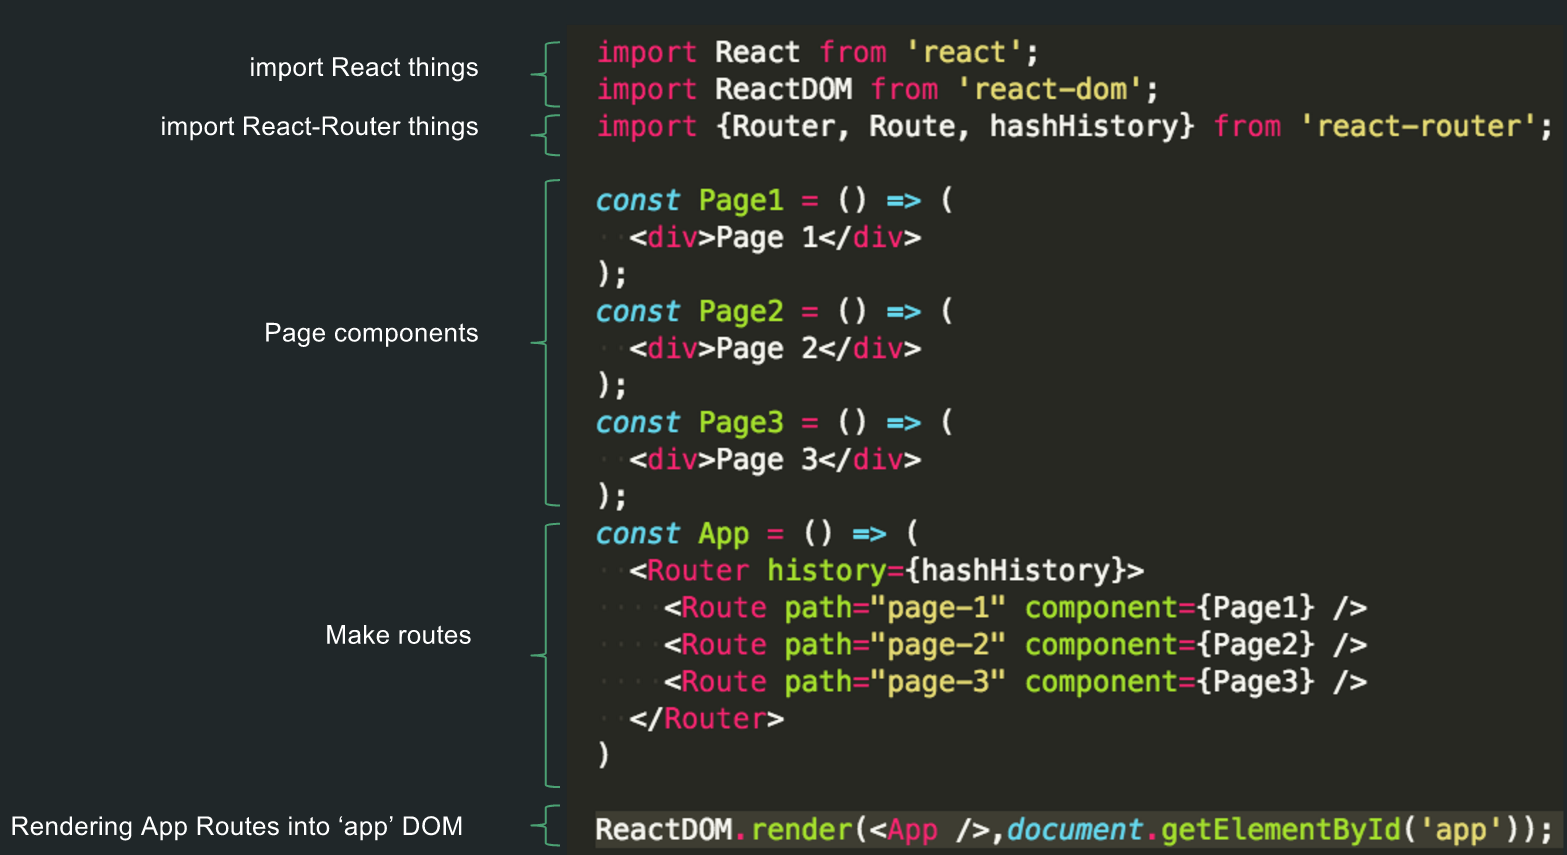
Ở sample này ta chỉ quan tâm đến vấn đề React App sẽ render Route Component tương ứng với URL (path) nó Route đó đã config.Cụ thể
- khi URL là #/page-1 thì nó render component Page1
- khi URL là #/page-2 thì nó render component Page2
- khi URL là #/page-3 thì nó render component Page3
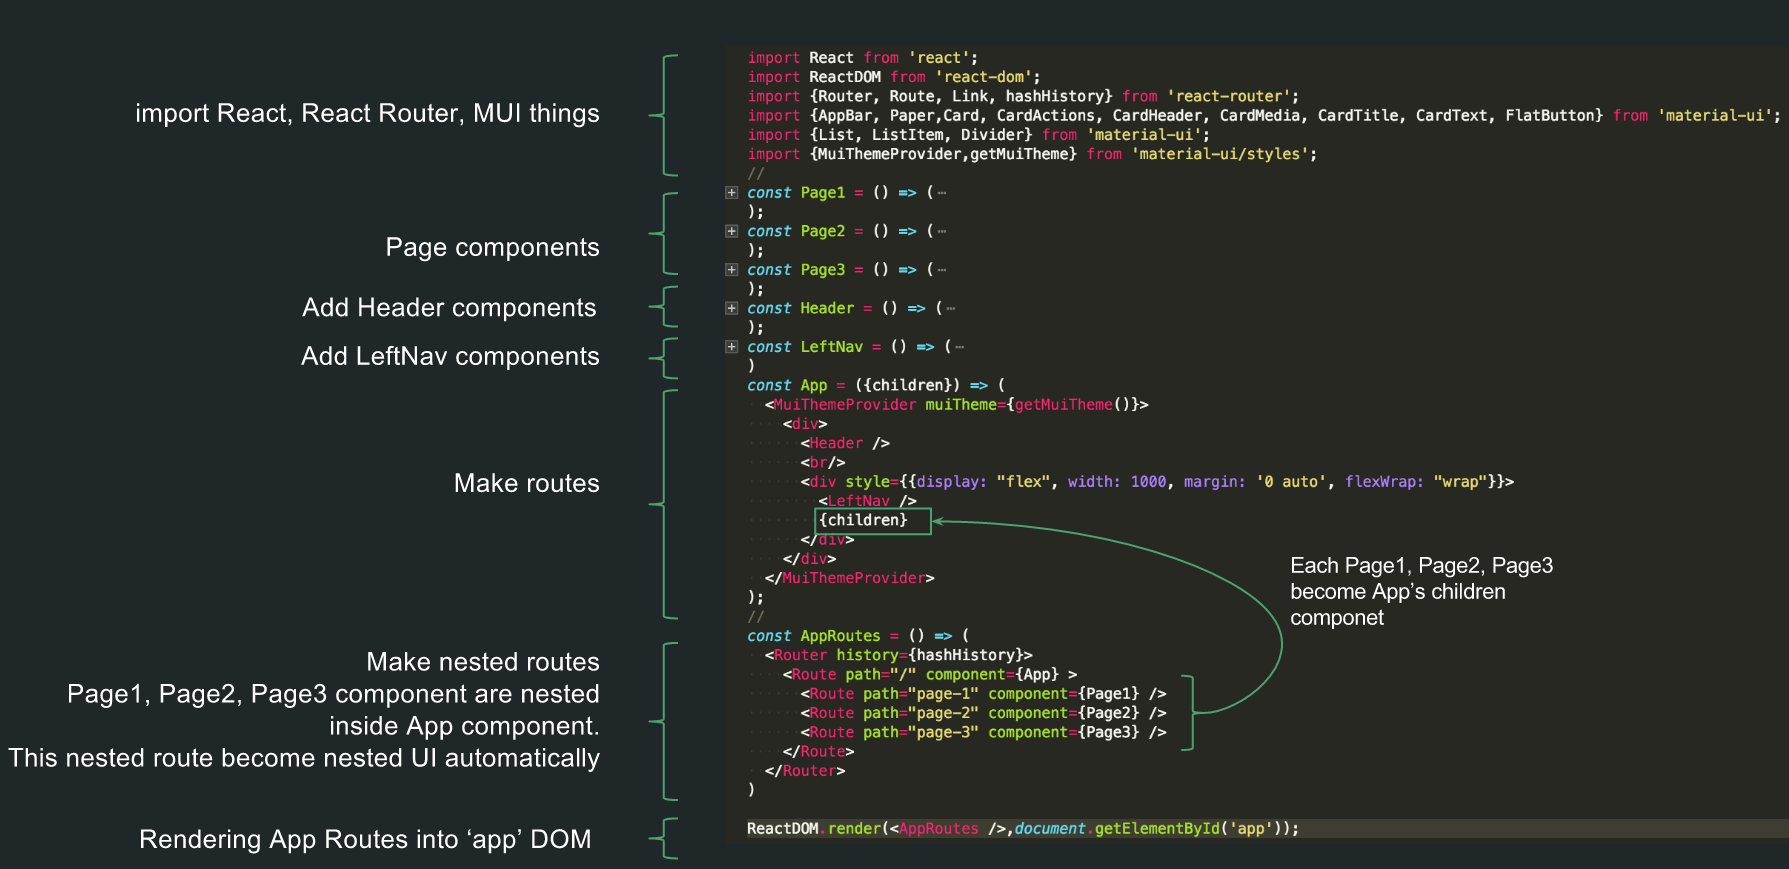
Nested Route
Ở sample này, chúng ta sẽ đi sâu hơn 1 chút. Cụ thể sẽ lồng các route con là#/page-1, #/page-2, #/page-3 vào trong route cha là “/”.Có các vấn đề về nested route như sau:
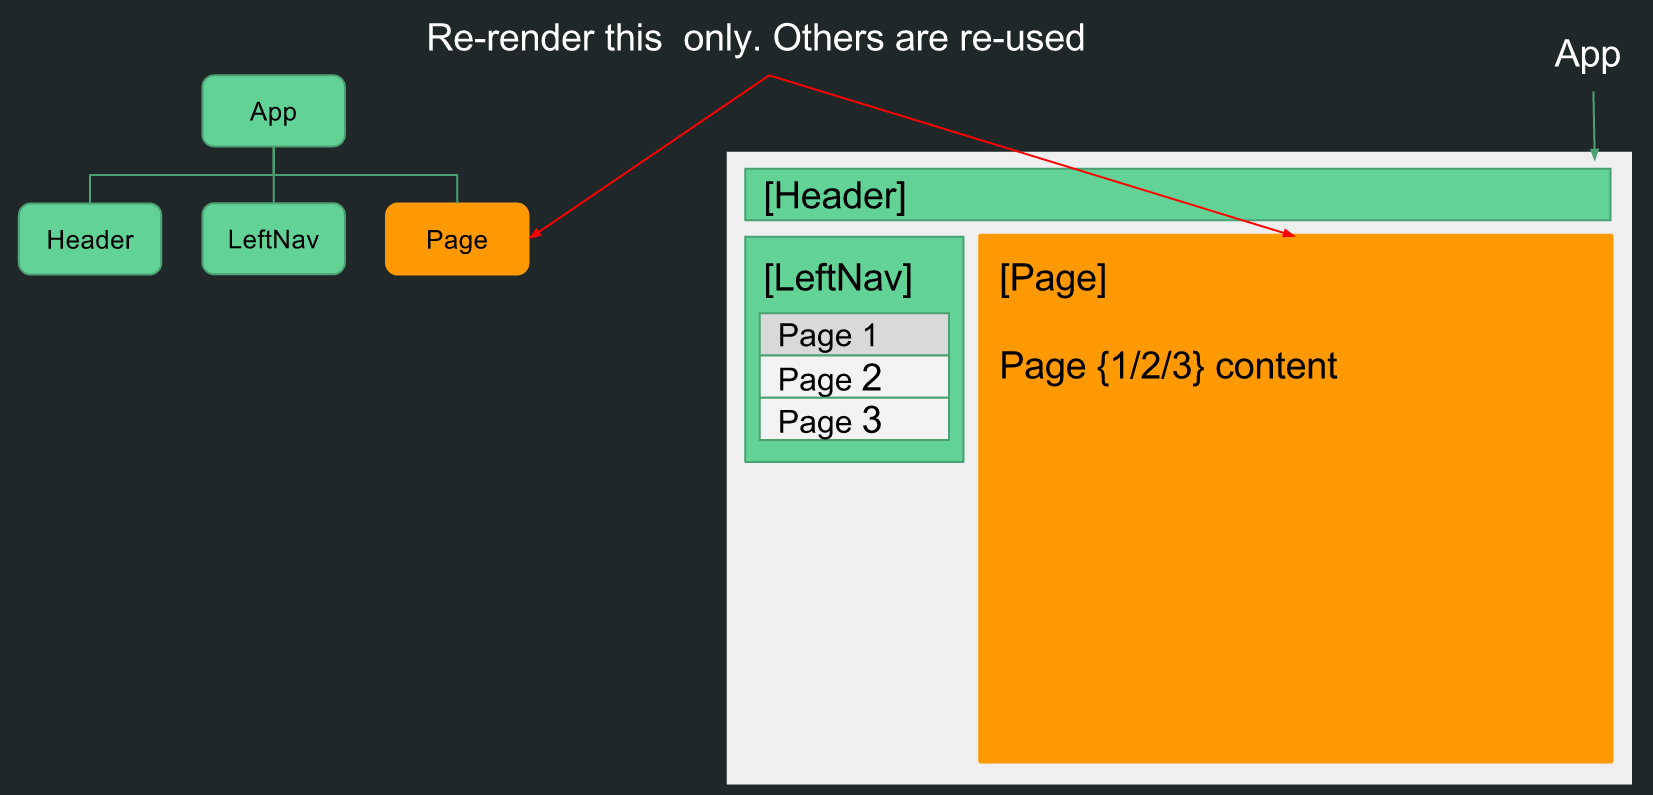
- React App được xây dựng từ việc lồng các Component con trong các Component cha.
- Khi chuyển trang thì có những component như Header, Navigation sẽ không thay đổi. Nên thực ra mình chỉ render lại Component Node nào cần thay đổi thôi.
- Khi nest các Route thì nó cũng sẽ tự động nest các Component tương ứng.
- Trình tự tạo React App sẽ là xác định route cha (App Route), sau đó đặt các Route con (Page Route) bên trong nó. Sau đó, render các Component con (Page) tương ứng bên trong Component cha (App).
Coding
Init Project
Tham khảo Bài viết về reactjs và material-uiCấu trúc Project
.
|-- dist                           // build
|-- node_modules                   // node_modules folder
|-- package.json                   // project packages
|-- readme.md                      // readme
|-- simple.html                    // HTML for simple route
|-- simpleRouteApp.js              // simple route js
|-- nested.html                    // HTML for nested route
|-- nestedRouteApp.js              // nested route js
|-- webpack-nested-route.config.js // webpack config for nested route
`-- webpack-simple-route.config.js // webpack config for simple route
Giải thích nội dung config file
Package.json
{
  "name": "react-mui-router-sample",
  "version": "1.0.0",
  "description": "reactjs-mui-router-sample",
  "main": "app.js",
  "scripts": {
    "test": "test",
    "build-simple": "webpack --config webpack-simple-route.config.js --progress --colors",
    "build-nest": "webpack --config webpack-nested-route.config.js --progress --colors"
  },
  "repository": {
    "type": "git"
  },
  "keywords": [
    "reactjs",
    "material-ui",
    "react-router"
  ],
  "author": "phungnc",
  "license": "ISC",
  "homepage": "/reactjs-mui-router-sample#readme",
  "devDependencies": {
    "babel-core": "^6.9.1",
    "babel-loader": "^6.2.4",
    "babel-preset-es2015": "^6.9.0",
    "babel-preset-react": "^6.5.0",
    "material-ui": "^0.15.1",
    "react": "^15.1.0",
    "react-dom": "^15.1.0",
    "react-router": "^2.4.1",
    "react-tap-event-plugin": "^1.0.0",
    "webpack": "^1.13.1"
  }
}
    "build-simple": "webpack --config webpack-simple-route.config.js --progress --colors",
"build-nest": "webpack --config webpack-nested-route.config.js --progress --colors"webpack-simple-route.config.js và build-nest sẽ call file webpack-nested-route.config.js. Lệnh call tương ứng sẽ là:
npm run build-simple
npm run build-nest
webpack config
module.exports = {
  entry: './nestedRouteApp.js',
  output: {
    path: __dirname + '/dist',
    filename: 'nestedRouteApp-bundle.js'
  },
  module: {
    loaders: [
      {
        test: /\.js$/,
        loaders: ['babel-loader'],
        exclude:  /(node_modules)/
      }
    ]
  }
}
module.exports = {
  entry: './nestedRouteApp.js',
  output: {
    path: __dirname + '/dist',
    filename: 'nestedRouteApp-bundle.js'
  },
  module: {
    loaders: [
      {
        test: /\.js$/,
        loaders: ['babel-loader'],
        exclude:  /(node_modules)/
      }
    ]
  }
}https://github.com/phungnc/reactjs-mui-router-sample.git
Sau khi fork về, bạn hãy mở các file js tương ứng và tham khảo thêm hình giải thích bên dưới:
Simple Route Sample
Nested Route Sample
Run:
Install node modules:
npm install
Build
// build simple sample
npm run build-simple

// build nested route sample
npm run build-nest
Run
open simple sampleopen simple.html../simple.html#/page-1
../simple.html#/page-2
../simple.html#/page-3
open nested route sample
open nested.html