Reactjs - Bài 17 - Tìm hiểu Jest Framework là gì

Goal

Giới thiệu Reactjs Testing Framework: Jest

Testing Framework

Phần TestUtils đã cho bạn khái niệm về các phương thức test React Component, bây giờ chúng ta sẽ thử ứng dụng Testing Framework.

Mặc dù khi tìm hiểu các bài viết về Reactjs Testing Framework, tôi có thấy nhiều ý kiến cho rằng Jest không bằng các Javascript Testing Framework khác như Mocha hay Karma, nhưng vì theo tôi đang viết theo series về Reactjs nên ở đây tôi sẽ tìm hiểu và giới thiệu Jest.

Jest

From Offical Page:

Jest provides you with multiple layers on top of Jasmine:

1.Automatically finds tests to execute in your repo
2.Automatically mocks dependencies for you when running your tests
3.Allows you to test asynchronous code synchronously
4.Runs your tests with a fake DOM implementation (via jsdom) so that your tests can run on the command line
5.Runs tests in parallel processes so that they finish sooner

Mock trong Jest

Tôi nghĩ tôi cần giải thích sơ qua Mock trong Jest.
Mock có nghĩa là làm giả, làm nhái. Để làm quen từ ngữ tôi sẽ dùng từ mock với nghĩa trên.Jest có thể mock các modules, functions, component thành một “mocked version” rồi sử dụng các Mock này mà không phải đụng đến “real version” của nó.

Mock API Reference

jest.mock(moduleName)

-> should always return a mocked version of the specified module from require() (e.g. that it should never return the real module).

jest.dontMock(moduleName)

-> should never return a mocked version of the specified module from require() (e.g. that it should always return the real module)

Getting Started:

Tôi sẽ thử test cái source code trong bài trước là Reusable Component.

Setup

Trước mắt, cần setup source code như sau:

  1. Copy toàn bộ thư mục “material-ui-component” thành thư mục “testing”.
  2. Tách source code trong file main.jsx thành các Component như member.jsx.
  3. Tạo thư mục test để chứa các file test
  4. Tạo npm test command:

    Trong thư mục “testing”:

    npm init

    để tạo file package.json (File này sẽ có vai trò chứa những config cho Jest sau này), khi init nhớ nhập ‘jest’ cho line test command: jest

  5. JSX transformer: vì source code “material-ui-component” viết theo syntax JSX nên khi test ta cũng cần chuyển đổi JSX thành JS, trong file package.json ta thêm đoạn code sau:

    "jest": {
    "scriptPreprocessor": "preprocessor.js"
    }

Và tạo file preprocessor.js

var ReactTools = require('react-tools');
module.exports = {
  process: function(src) {
    return ReactTools.transform(src, {harmony: true});
  }
};

Bạn cũng cần install react-tools.
6. Remove Mock

Trong file package.json, ta thêm như sau để chỉ định việc không mock tất cả các node module


"jest": {
"scriptPreprocessor": "preprocessor.js",
"unmockedModulePathPatterns": ["node_modules/react"]
},

Tạo Unit Test cho Component member

__test__/member-test.js

jest.dontMock('../member.jsx');

var React = require('react/addons');
var Member= require('../member.jsx');
var TestUtils = React.addons.TestUtils;

describe('Member component', function() {

  it('set name for member', function() {

    // Render a member with name is Foo
    var memberFoo = TestUtils.renderIntoDocument(
      <Member name="Foo" />
    );
    // Verify that it's name is Foo
    var memberName = TestUtils.findRenderedComponentWithType(memberFoo, Member);
    expect(memberName.getDOMNode().textContent).toEqual('Foo');

  });

});

Problem:

Với version nodejs tôi đang dùng là v0.11.14 thì khi chạy sample mẫu từ Jest thì OK, tuy nhiên khi thử test với Component member.jsx thì bị lỗi là: “Error: Worker process exited before responding! exit code: null, exit signal: SIGSEGV stderr:”. Và dường như đây là 1 known issue

https://github.com/facebook/jest/issues/243

Và tôi cũng đã thử với version mới nhất của nodejs tại thời điểm này là là v0.12.5 nhưng cũng không khá hơn.

Note: tôi đang dùng nvm để quản lý version của nodejs. Nhờ nó tôi dễ dàng upgrade cũng như downgrade version của nodejs.

Cũng theo một comment trên https://github.com/facebook/jest/issues/243 , tôi thử dùng nodejs 0.10 và thử retest thì OK:

#Chuyển sang node v0.10
nvm use 0.10

#Rebuild all dependencies
npm rebuild

#Run test
npm test

Bạn có thể thử thay đổi ‘Foo’ trong .toEqual('Foo') thành ‘Fool’ và thử chạy lại câu lệnh npm test, nó sẽ báo kết quả Fail.

Source code demo cho ví dụ trên:

https://github.com/phungnc/reactjs-tut-demo/tree/feature/jest/jest

Tôi cũng thử viết thêm một vài test cho member component vào file __test__/member-test.js:

https://github.com/phungnc/reactjs-tut-demo/blob/feature/jest_testing_more_complex/jest/member.jsx

Reactjs - Bài 16 - Testing - sử dụng TestUtils

Goal

Hôm nay tôi sẽ viết về Reactjs Addons TestUtils trong Reactjs.

TestUtils

http://facebook.github.io/react/docs/test-utils.html

TestUtils là một addon của Reactjs, cung cấp các method để test các React components.

Các mục như Simulate, renderIntoDocument đã viết khá rõ trong link trên. Ở đây tôi chỉ cố gắng demo 2 dạng testing là Assert và Component Testing.

Tôi có dùng lại Source Code bài Addon ReactLink để demo, lý do là nó đã có include sẵn React Addons :).

Bạn hãy chạy đoạn code dưới và xem kết quả nhé.

<!DOCTYPE html>
<html>
<head>
  <meta http-equiv='Content-type' content='text/html; charset=utf-8'>
  <title>Basic React TestUtils Testing</title>
</head>
<body>
  <script src="https://cdnjs.cloudflare.com/ajax/libs/react/0.13.3/react.js"></script>  
  <script src="https://cdnjs.cloudflare.com/ajax/libs/react/0.13.3/JSXTransformer.js"></script>
  <script src="https://cdnjs.cloudflare.com/ajax/libs/react/0.13.3/react-with-addons.js"></script>
  <script type="text/jsx">
    var Hello = React.createClass({
      render: function() {
        return (
          <div>{this.props.name}</div>
        );
      }
    });
    var OnlyMe = React.createClass({
      render: function() {
        return (
          <div>{this.props.name}</div>
        );
      }
    });
    var Link = React.createClass({
      mixins: [React.addons.LinkedStateMixin],
      getInitialState: function() {
        return {message: 'Hello!'};
      },
      handleChange: function(newValue) {
        this.setState({message: newValue});
      },
      render: function() {
       var valueLink = {
          value: this.state.message,
          requestChange: this.handleChange
        };
        var valueLinkk =this.linkState('message');
        return (
          <div>
            <Hello name="FOO "/>
            <Hello name="BAR"/>
            <OnlyMe name="OnlyMe"/>
            <p className="title">{valueLink.value}</p>
            <span className="title">World!</span>
            <span className="sub-title">My Name is C.P</span>
            <input type="text" valueLink={valueLink} />
          </div>
        );
      }
    });

    var LinkComponent = React.render(<Link />, document.body);

    // TestUtils
    var TestUtils = React.addons.TestUtils;
    // Assert
    document.write("=== Assert Testing Type ===");
    //
    document.write("<br/>");
    document.write("<br/>");
    document.write("<b>1.isElement: check if Link is an Element</b>");
    document.write("<br/>");
    document.write(">>>Result is: ",TestUtils.isElement(<Link />));
    //
    document.write("<br/>");
    document.write("<br/>");
    document.write("<b>2.isElementOfType : check if Link is is a ReactElement whose type is of a React componentClass</b>");
    document.write("<br/>");
    document.write(">>>Result is: ",TestUtils.isElementOfType(<Link />, Link));
    //
    document.write("<br/>");
    document.write("<br/>");
    document.write("<b>3.isDOMComponent: check if Link instance is a DOM component (such as a <div> or <span>)</b>");
    document.write("<br/>");
    document.write(">>>Result is: ",TestUtils.isDOMComponent(LinkComponent));
    //
    document.write("<br/>");
    document.write("<br/>");
    document.write("<b>4.isCompositeComponent : check if Link instance is a composite component (created with React.createClass())</b>");
    document.write("<br/>");
    document.write(">>>Result is: ",TestUtils.isCompositeComponent(LinkComponent));
    //
    document.write("<br/>");
    document.write("<br/>");
    document.write("<b>5.isCompositeComponentWithType : check if Link instance is a composite component (created with React.createClass()) whose type is of a React componentClass.</b>");
    document.write("<br/>");
    document.write(">>>Result is: ",TestUtils.isCompositeComponentWithType(LinkComponent, Link));
    //
    document.write("<br/>");
    document.write("<br/>");
    document.write("=== Component Testing Type ===");
    document.write("<br/>");
    document.write("<b>1.array findAllInRenderedTree(ReactComponent tree, function test)</b>");
    document.write("<br/>");
    document.write("Traverse all components in tree and accumulate all components where test(component) is true. This is not that useful on its own, but it's used as a primitive for other test utils.");
    document.write("<br/>");
    document.write(">>> Result is: ",
      TestUtils.findAllInRenderedTree(LinkComponent, 
        function(component) { return component.tagName === "P" }
      ).map(function(component){ return component.getDOMNode().textContent })
    );
    //
    document.write("<br/>");
    document.write("<br/>");
    document.write("<b>2.array scryRenderedDOMComponentsWithClass(ReactComponent tree, string className)</b>");
    document.write("<br/>");
    document.write("Finds all instances of components in the rendered tree that are DOM components with the class name matching className");
    document.write("<br/>");
    document.write(">>> Result is: ",TestUtils.scryRenderedDOMComponentsWithClass(LinkComponent, 
      'title'
      ).map(function(component){ return component.getDOMNode().textContent }));
    //
    document.write("<br/>");
    document.write("<br/>");
    document.write("<b>3.ReactComponent findRenderedDOMComponentWithClass(ReactComponent tree, string className)</b>");
    document.write("<br/>");
    document.write("Like scryRenderedDOMComponentsWithClass() but expects there to be one result, and returns that one result, or throws exception if there is any other number of matches besides one.");
    document.write("<br/>");
    document.write(">>> Result is: ",TestUtils.findRenderedDOMComponentWithClass(LinkComponent, 
      'sub-title'
      ).getDOMNode().textContent);
    //
    document.write("<br/>");
    document.write("<br/>");
    document.write("<b>4.array scryRenderedDOMComponentsWithTag(ReactComponent tree, string tagName)</b>");
    document.write("<br/>");
    document.write("Finds all instances of components in the rendered tree that are DOM components with the tag name matching tagName");
    document.write("<br/>");
    document.write(">>> Result is: ",TestUtils.scryRenderedDOMComponentsWithTag(LinkComponent, 
      'span'
      ).map(function(component){ return component.getDOMNode().textContent }));
    //
    document.write("<br/>");
    document.write("<br/>");
    document.write("<b>5.ReactComponent findRenderedDOMComponentWithTag(ReactComponent tree, string tagName)</b>");
    document.write("<br/>");
    document.write("Like scryRenderedDOMComponentsWithTag() but expects there to be one result, and returns that one result, or throws exception if there is any other number of matches besides one.");
    document.write("<br/>");
    document.write(">>> Result is: ",TestUtils.findRenderedDOMComponentWithTag(LinkComponent, 
      'p'
      ).getDOMNode().textContent);
    //
    document.write("<br/>");
    document.write("<br/>");
    document.write("<b>6.array scryRenderedComponentsWithType(ReactComponent tree, function componentClass)</b>");
    document.write("<br/>");
    document.write("Finds all instances of components with type equal to componentClass");
    document.write("<br/>");
    document.write(">>> Result is: ",TestUtils.scryRenderedComponentsWithType(LinkComponent, 
      Hello
      ).map(function(component){ return component.getDOMNode().textContent }));
    //
    document.write("<br/>");
    document.write("<br/>");
    document.write("<b>7.ReactComponent findRenderedComponentWithType(ReactComponent tree, function componentClass)</b>");
    document.write("<br/>");
    document.write("Same as scryRenderedComponentsWithType() but expects there to be one result and returns that one result, or throws exception if there is any other number of matches besides one.");
    document.write("<br/>");
    document.write(">>> Result is: ",TestUtils.findRenderedComponentWithType(LinkComponent, 
      OnlyMe
      ).getDOMNode().textContent);
    //
  </script>
</body>
</html>

Reactjs - Bài 15 - Tái sử dụng Component Material UI trong Reactjs

Goal

Giới thiệu việc sử dụng Component có sẵn cho Reactjs.

Reusalbe Components

“When designing interfaces, break down the common design elements (buttons, form fields, layout components, etc.) into reusable components with well-defined interfaces. That way, the next time you need to build some UI, you can write much less code. This means faster development time, fewer bugs, and fewer bytes down the wire.”
facebook
Lược dịch:
Khi design giao diện, hãy break down những design elements như button, form fields, layout components, v.v… thành các components có thể tái sử dụng và well-defined interfaces (I/F của components). Với cách này, bạn không cần tốn nhiều thời gian cho lần tạo giao diện tiếp theo. Nghĩa là thời gian phát triển nhanh hơn, ít bug hơn, và giảm bớt wire.

Tìm React Component ở đâu?

Bạn có thể tìm kiếm các React Component ở site bên dưới này.

ReactComponent

Đây là site tập hợp các ReactComponent.
http://react-components.com/

React Rocks

http://react.rocks/

Github wiki

https://github.com/facebook/react/wiki/Complementary-Tools#ui-components

Thử sử dụng một ReactComponent

Hiện tại trên trang http://react-components.com/, tôi sẽ thử sử dụng một Component phổ biến nhất là material-ui để tạo giao diện cho demo Avatar.
Source code:
https://github.com/phungnc/reactjs-tut-demo/tree/feature/material-ui-component/material-ui-component
Trong source code mới này:
1. Vì material-ui đã có Componet Avatar, nên tôi sẽ đổi trên các Component trong demo trước từ Avatar thành Member.
2. Các file delete.jsx, toggle-star.jsx là các Icon Component tôi download từ https://github.com/callemall/material-ui/tree/master/src/svg-icons
3. Tôi vẫn dùng Browserify cho nên bạn vẫn phải dùng lệnh browserify -t reactify avatar.jsx > bundle.js để bundle up file bundle.js.
4. Khi thực hiện browserify nếu xảy ra lỗi thiếu module nào thì hãy install module đó.

Reactjs - Bài 14 - React router

Reactjs - router

[Update ngày 21/06/2016]
Nội dung bài viết bên dưới cách đây 1 năm, hiện tại react-router đã update rất nhiều, nên tôi khuyến khích các bạn hãy cập nhật nội dung về  react-router tại
https://github.com/reactjs/react-router-tutorial/tree/master/lessons

Tuy nhiên nội dung bên dưới vẫn có giá trị tham khảo, đặc biệt là khi có và không có react-router.

Goal

Giới thiệu react-router.

Giới thiệu

Nếu các bạn đã trải qua các bài viết từ bài đầu tiên đến giờ có lẽ bạn cũng đã nhận ra rằng React.js chỉ là thư viện để tạo các Component, nó không có Router.
react-router được dùng để giúp việc dẫn hướng UI đồng bộ với URL.
Để giúp các bạn hiểu rõ hơn react-router, chúng ta sẽ thử implement 2 tình huống như sau
- Without react-router
- With react-router
- Server rendering react-router
Cách này tôi dựa trên ý tưởng theo tài liệu của React Router nhưng được trình bày lại theo luồng source code demo từ những bài trước, cho nên nếu việc tham khảo trực tiếp thông qua tài liệu của React Router khiến bạn dễ hiểu hơn thì bạn nên tham khảo nó.
Ý tưởng demo như sau:
Chúng ta sẽ sử dụng source code Avatar list, và thêm trang detail cho từng Avatar. Có nghĩa là từ list Avatar, click vào link của từng Avatar thì nó chuyển sang trang Avatar detail của Avatar đó.

Without react-router

Thêm đoạn code xử lý load nội dung Avatar list hay Avatar Item theo route:
var App = React.createClass({
  render(){
    var Child;
    switch (this.props.route) {
      case 'avatars': Child = Avatars; break;
      case 'avatar': Child = Avatar; break;
      default: Child = Avatars;
    }
    return(
      <div>
        <Child />
      </div>
    )
  }
});

function render(){
  var route = window.location.hash.substr(1);
  React.render(<App route = {route}/>, document.body);
}
window.addEventListener('hashchange', render);
render();
App sẽ render các nội dung khác nhau tùy theo giá trị this.props.route. Nếu chỉ 2 trường hợp như trên thì còn khá là đơn giản nhưng trong trường hợp nhiều trang hơn, nhiều cấp cho route hơn thì vấn đề sẽ nhanh chóng trở nên phức tạp.
Source code minh họa:
https://github.com/phungnc/reactjs-tut-demo/tree/feature/route_without_react_router/route-without-react-router
Lưu ý: Vì tôi đã giới thiệu việc dùng browserify trong bài trước, nên từ bây giờ tôi sẽ dùng browserify cho việc require các module cần thiết. Cho bạn cần dùng câu lệnh sau để build file bundle.js
browserify -t reactify avatar.jsx > bundle.js

With react-router

Phần xử lý route sẽ trở thành:
var routes  = (
  <Route handler={App}>
    <DefaultRoute handler={Avatars} />
    <Route name="avatars" handler={Avatars} />
    <Route name="avatar" handler={Avatar} />
  </Route>
);

var App = React.createClass({
  render(){
    return(
      <div>
        <RouteHandler/>
      </div>
    )
  }
});
//Finally we need to listen to the url and render the application.
Router.run(routes, Router.HashLocation, function(Root) {
  React.render(<Root/>, document.body);
});
Nhớ là bạn cần ‘require’ react-router Router = require('react-router'); ở đầu file.
Source code:
https://github.com/phungnc/reactjs-tut-demo/tree/feature/route_with_react_router/route-with-react-router
Trong phần này, bạn cần đọc thêm các nội dung ở link này:
https://github.com/reactjs/react-router-tutorial/tree/master/lessons

Server-side rendering and react-router

React-router chẳng những có thể dùng ở phía client mà còn dùng được ngay cả khi render React App ở phía Server.
Nếu bạn hiểu sơ qua nguyên lý hoạt động React-router ở trên và đã đọc qua bài viết Server-side rendering thì việc modify lại code dùng React-router cho phía server sẽ không có vấn đề gì. Chỉ cần chú ý một chút là ở Sever chúng ta bundle up file browser.js
browserify -t reactify browser.js > bundle.js
Source code:
https://github.com/phungnc/reactjs-tut-demo/tree/feature/server_side_react_router/server-rendering-react-router

Reactjs - Bài 13 - server-side renderring

Goal

Trong các bài trước chúng ta chỉ sử dụng Reactjs ở phía Client, chúng ta có thể render HTML hoàn toàn ở phía Client. Trong bài này tôi sẽ giới thiệu cách ứng dụng Reactjs trong việc render HTML ở phía Server.

Client-side rendering

Trong các ví dụ trước, chúng ta render View hoàn toàn ở phía client nhờ vào method React.render(). Hãy xem hình minh họa bên dưới

Client-side-rendering

Để giúp các bạn hiểu rõ quá trình chuyển việc render từ phía client sang phía server cho nên tôi sẽ liệt kê các bộ phận cũng như từng bước của việc render ở phía Client như sau:

  1. File index.html: layout của view, chứa DOM để gắn ReactElement vào (trong các bài trước, tôi gắn React Element vào thẻ ).
  2. Include các file react.js, JSXTransformer.js,(ngoài ra còn có các file khác như superagent.js hay React-addon…)
  3. React.createClass() định nghĩa Virtual DOM
  4. React.createElement() tạo Virtual DOM
  5. React.render() render Virtual DOM vào thẻ
  6. Có một được một trang index.html hoàn chỉnh.

Source code mẫu cho Client-side rendering:

<!DOCTYPE html>
<html>
<head>
  <meta http-equiv='Content-type' content='text/html; charset=utf-8'>
  <title>Basic Example Props</title>
</head>
<body>
  <script src="https://cdnjs.cloudflare.com/ajax/libs/react/0.13.3/react.js"></script>  
  <script src="https://cdnjs.cloudflare.com/ajax/libs/react/0.13.3/JSXTransformer.js"></script>
  <script src="https://cdnjs.cloudflare.com/ajax/libs/superagent/0.15.7/superagent.min.js"></script>
  <script type="text/jsx">

    var Avatar = React.createClass({
      propTypes: {
        id: React.PropTypes.string.isRequired,
        name: React.PropTypes.string.isRequired,
        width: React.PropTypes.number.isRequired,
        height: React.PropTypes.number.isRequired,
        initialLike: React.PropTypes.bool.isRequired,
        // Thêm Interface onDelete()
        onDelete: React.PropTypes.func.isRequired,
      },
      getInitialState() {
        return {
          liked: this.props.initialLike
        };
      },
      onClick() {
        this.setState({liked: !this.state.liked});
      },
      // Ủy quyền cho Component cha xử lý.
      _onDelete() {
        this.props.onDelete(this.props.id);
      },
      render() {
        var textLike = this.state.liked ? 'like' : 'haven\'t liked';
        return (
          <li key={this.props.id}>
            <span>{this.props.id}</span>
            <img  src={this.props.src} width={this.props.width} height={this.props.height} alt="alt" />
            <span>{this.props.name}</span>
            <button onClick={this.onClick}>{textLike}</button>
            <button onClick={this._onDelete}>Delete</button>
          </li>
        );
    }
    });
    var request = window.superagent;
    var Avatars = React.createClass({

      getInitialState() {
        return {
          avatars: [
            {id: 1, name: "Avatar 1", height: 100, width: 100, like: false, src: "http://canime.files.wordpress.com/2010/05/mask-dtb.jpg"},
            {id: 2, name: "Avatar 2", height: 100, width: 100, like: true, src: "http://z4.ifrm.com/30544/116/0/a3359905/avatar-3359905.jpg"},
            {id: 3, name: "Avatar 3", height: 100, width: 100, like: false, src: "http://www.dodaj.rs/f/O/IM/OxPONIh/134.jpg"}
          ]
        }
      },
      // Thêm method deleteItem() set lại State (chứa các Component con) cho Component cha này
      deleteItem(id) {
        this.setState({
          avatars: this.state.avatars.filter(function(avatar){
            return avatar.id !== id;
          })
        });
      },
      componentDidMount: function() {
        var self = this;
        request.get('http://localhost:3000/api/employees', function(res) {
        console.log(res);
          self.setState({avatars: res.body});
        });
      },

      render() {  
        var avatars = this.state.avatars.map(function(avatar){
        // use below solution
        // map(function(){},this) 
        // or map(function(){}.bind(this)) 
        // or var that = this; onDelete = {that.deleteUser}
        // to pass this value to map function.
        // bind onDelete (event) to deleteUser.
          return <Avatar onDelete={this.deleteItem} id={avatar.id} name={avatar.name} width={avatar.width} height={avatar.height} src={avatar.src} initialLike={avatar.like} />;
        }, this);
        return (
          <ul>
            {avatars}
          </ul>
        );
      }
    });

    var AvatarsComponent = React.render(<Avatars />, document.body);
  </script>
</body>
</html>

Server-side rendering

Server-side rendering thực chất là việc tạo ra và trả về browser 1 trang index.html hoàn chỉnh.

Server-side-rendering

Để thực hiện điều đó chúng ta cũng cần các bước trên, nhưng sẽ có một số biến đổi tương đượng như sau:

  1. File index.html
    Chúng ta sẽ dùng ngôn ngữ template để gắn ReactElement vào vị trí DOM cần thiết (vì ở server thì chưa có Real DOM để chúng ta get và gắn vào). Ở đây tôi dùng ngôn ngữ template là jade, cho nên chúng ta cũng sẽ có file index.jade. File này cũng chứa layout của View

  2. Include các file react.js, JSXTransformer.js
    Tôi dùng nodejs, nên tôi sẽ dùng method require() để include các package tương ứng.

  3. React.createClass() không thay đổi

  4. React.createElement() không thay đổi
  5. React.render() ở phía client có 2 ý nghĩa là render Virtual DOM thành HTML (hay real DOM) và gắn vào thẻ . Điều đó, phía server sẽ thực hiện một cách tương tự như sau:

    • Dùng React.renderToString. (Vui lòng tham khảo method này để hiểu thêm) để trả về một HTML string (chứa nội dung HTML mà ta muốn render).
    • Truyền HTML string đó vào thông qua biến !{markup}. Jade engine sẽ render ra index.html hoàn chỉnh
  6. Trả về cho Browser trang index.html vừa tạo ra ở trên.

Server-side-rendering-static

Source code:

https://github.com/phungnc/reactjs-tut-demo/tree/feature/server_side_rendering_static/server-rendering-static

Lưu ý: bạn hãy tự cài những module còn thiếu nhé, vì có những module tôi dùng như là global module nên khi viết source này tôi không có cài lại.

Sau khi bạn clone về, bạn start cái server bằng lệnh:

node server

và vào link:

http://localhost:5000

Boom! bạn đã có được một View giống như khi render ở phía client.
Tuy nhiên khi bạn thử click và button như like hay là delete thì chẳng có điều gì xảy ra. Tại sao vậy?

Tại vì thực ra server chỉ trả về cho Browser 1 file HTML tĩnh có “gắn” phần HTML vừa được React tạo ra vào thẻ <body> thôi chứ không có phần source code JS đi kèm theo. Điều này khác với việc render ở Client là bản thân souce code JS đã include sẵn. Cho nên bây giờ ta tiếp tục “trả” về cho client source code JS đó.

Để thực hiện điều này, tôi dùng browserify để “write code that uses require in the same way that you would use it in Node”. Cho nên chúng ta sẽ tận dụng cách viết ở phía Node Server cho phía Client. Browserify sẽ bundle up (tập hợp) tất cả các module cần thiết định nghĩa trong file mà chúng ta tạm gọi là browser.js thành file bundle.js và gửi cho Client.

Hình mình họa:

server-side rendering dynamic

Bây giờ, chúng ta sẽ tạo một file là browser.js để thông qua nó Browserify tạo file bundle.js:

'use strict';
var React   = require('react'),
    Avatar = require('./avatar');
React.render(<Avatar />, document.body);

Vì ở đây chúng ta dùng JSX syntax cho nên chúng ta cũng cần reactify để giúp Browserify transform JSX.

Bạn có thể thử command như bên dưới để thử bundle up file bundle.js từ file browser.js ở trên:

browserify -t reactify browser.js > bundle.js

Khi bạn mở file bundle.js, bạn sẽ thấy file bundle.js này đã gộp Reactjs và file avatar.js lại thành một.

OK, chúng ta đã có bundle.js giờ chỉ cần gửi file này về cho browser bằng cách thêm đoạn code sau vào bên dưới body trong file index.jade

    |     
    script(src='./bundle.js')

Và thêm dòng code sau app.use(Express.static(__dirname + '/')); vào bên dưới dòng app.set('view engine', 'Jade'); ở file server.js để báo cho express.static biết là nơi chứa các file static.

Bây giờ bạn reload lại page, thử click các button thử xem, It’s work!

Source code:

https://github.com/phungnc/reactjs-tut-demo/tree/feature/server_side_rendering_dynamic/server-rendering

Lưu ý: bạn hãy tự cài những module còn thiếu nhé, vì có những module tôi dùng như là global module nên khi viết source này tôi không có install vào.

Việc sử dụng Javascript ở cả server và client người ta gọi là Isomorphic JavaScript (Javascript đồng hình)

!= Nodejs

  1. react-php-v8js
    https://github.com/reactjs/react-php-v8js

  2. react-rails
    https://github.com/reactjs/react-rails

  3. React.NET
    https://github.com/reactjs/React.NET

  4. react-python
    https://github.com/reactjs/react-python

Reactjs - Bài 12 - Addon

Goal

Giới thiệu addon trong Reactjs

1. Addon

React.addons là nơi ta đóng gói những utils dành cho việc xây dựng React apps.

Cách sử dụng:

Thêm

<script src="https://cdnjs.cloudflare.com/ajax/libs/react/0.13.3/react-with-addons.js"></script>

vào phần head của page.

Animation Addon.

React cung cấp addon component ReactTransitionGroup như là low-level API for animation, và một ReactCSSTransitionGroup để dễ dành implement những CSS animation và transition đơn giản.

Ví dụ

Lấy ví dụ trong bài ‘props and state’, ở ví dụ đó, ta có 1 list các Avatar. Khi click vào nút delete nào thì Avatar đó sẽ bị remove.

Bây giờ ta thử dùng Reactjs Animation Addon để tạo hiệu ứng khi ta remove một Avatar.

<!DOCTYPE html>
<html>
<head>
  <meta http-equiv='Content-type' content='text/html; charset=utf-8'>
  <title>Basic Example Props</title>
  <style>
    .example-leave {
      opacity: 1;
      transition: opacity .5s ease-in;
    }

    .example-leave.example-leave-active {
      opacity: 0.01;
    }
  </style>
</head>
<body>
  <script src="https://cdnjs.cloudflare.com/ajax/libs/react/0.13.3/react.js"></script>  
  <script src="https://cdnjs.cloudflare.com/ajax/libs/react/0.13.3/JSXTransformer.js"></script>
  <script src="https://cdnjs.cloudflare.com/ajax/libs/react/0.13.3/react-with-addons.js"></script>
  <script type="text/jsx">

    var Avatar = React.createClass({
      propTypes: {
        id: React.PropTypes.number.isRequired,
        name: React.PropTypes.string.isRequired,
        width: React.PropTypes.number.isRequired,
        height: React.PropTypes.number.isRequired,
        initialLike: React.PropTypes.bool.isRequired,
        // Thêm Interface onDelete()
        onDelete: React.PropTypes.func.isRequired,
      },
      getInitialState() {
        return {
          liked: this.props.initialLike
        };
      },
      onClick() {
        this.setState({liked: !this.state.liked});
      },
      // Ủy quyền cho Component cha xử lý.
      _onDelete() {
        this.props.onDelete(this.props.id);
      },
      render() {
        var textLike = this.state.liked ? 'like' : 'haven\'t liked';
        return (
          <li key={this.props.id}>
            <span>{this.props.id}</span>
            <img  src={this.props.src} width={this.props.width} height={this.props.height} alt="alt" />
            <span>{this.props.name}</span>
            <button onClick={this.onClick}>{textLike}</button>
            <button onClick={this._onDelete}>Delete</button>
          </li>
        );
    }
    });
    var ReactCSSTransitionGroup = React.addons.CSSTransitionGroup;
    var Avatars = React.createClass({

      getInitialState() {
        return {
          avatars: [
            {id: 1, name: "Avatar 1", height: 100, width: 100, initialLike: false, src: "http://canime.files.wordpress.com/2010/05/mask-dtb.jpg"},
            {id: 2, name: "Avatar 2", height: 100, width: 100, initialLike: true, src: "http://z4.ifrm.com/30544/116/0/a3359905/avatar-3359905.jpg"},
            {id: 3, name: "Avatar 3", height: 100, width: 100, initialLike: false, src: "http://www.dodaj.rs/f/O/IM/OxPONIh/134.jpg"}
          ]
        }
      },
      // Thêm method deleteItem() set lại State (chứa các Component con) cho Component cha này
      deleteItem(id) {
        this.setState({
          avatars: this.state.avatars.filter(function(avatar){
            return avatar.id !== id;
          })
        });
      },

      render() {  
        var avatars = this.state.avatars.map(function(avatar){
        // use below solution
        // map(function(){},this) 
        // or map(function(){}.bind(this)) 
        // or var that = this; onDelete = {that.deleteUser}
        // to pass this value to map function.
        // bind onDelete (event) to deleteUser.
          return <Avatar onDelete={this.deleteItem} id={avatar.id} name={avatar.name} width={avatar.width} height={avatar.height} src={avatar.src} initialLike={avatar.initialLike} />;
        }, this);
        return (
          <ul>
            <ReactCSSTransitionGroup transitionName="example">
              {avatars}
            </ReactCSSTransitionGroup>
          </ul>
        );
      }
    });

    var AvatarsComponent = React.render(<Avatars />, document.body);
  </script>
</body>
</html>

Các điểm updated:
1. Thêm react-with-addons.js
2. Thêm <style></style>
3. Wrap {avatars} bởi ReactCSSTransitionGroup

Trong component này, khi remove 1 item ra khỏi ReactCSSTransitionGroup nó sẽ lấy example-leave CSS class và example-leave-active CSS class được add vào trong ‘tick’ tiếp theo. Cái convention này dựa vào transitionName prop (Trong ví dụ trên ta có chỉ định transitionName=”example”).

2. Two-way binding

Phần này chủ yếu là tôi lược dịch lại từ trang gốc của Reactjs. Do đó nếu bạn cảm thấy nội dung trên trang gốc dễ hiểu hơn thì bạn nên bỏ qua bài này.

Chú ý: nếu bạn là Reactjs newbie thì bạn cũng không cần phải tìm hiểu về ReactLinkReactLink chưa cần thiết cho hầu hết các ứng dụng.

Trong Reactjs, data đi theo một luồng, theo mô hình input - output, ta gọi là one way binding.

Tuy nhiên, nhiều ứng dụng thường yêu cầu khi có lấy dữ liệu từ output và truyền ngược vào trong chương trình. Ví dụ như khi bạn muốn update React state từ input của user.

Trong React, để làm điều này, trước hết bạn phải listen sự kiện “change” ( onChange() ), rồi đọc giá trị của DOM và gọi setState() để thay đổi state của component. khi state của component thay đổi thì nó sẽ re-render lại UI của component.

Reactjs mang đến cho bạn addon ReactLink, sẽ luôn ràng buộc giữa giá trị của DOM và state của component. Hãy tưởng tượng, với ReactLink bạn đã có một sợi dây “kết nối” giữa data trên DOM và React state.

Chú ý: ReactLink thực chất cũng chỉ là một wrapper gộp onChange/setState(). Do đó về nguyên tắc nó không có thay đổi bản chất data flows trong React Application.

Phần ví dụ ReactLink: Before and After minh họa khá rõ về điều này, cho có lẽ tôi không cần trình bày thêm, chỉ lưu ý là ReactLink dùng mixins để thêm method linkState() từ LinkedStateMixin vào React component.

Trong bài trên, phần Under the Hood chủ yếu giải thích sâu hơn về LinkedStateMixin, nhưng tôi nghĩ trong giới hạn một newbie thì ta chỉ cần biết là React Addon có cung cấp LinkedStateMixin dành cho việt two-way binding. Còn nếu bạn muốn hiểu sâu hơn thì tôi nghĩ đọc source code react-with-addons.js phần LinkedStateMixin sẽ dễ hiểu hơn nhiều.

Ngoài 2 addon giới thiệu ở trên, Reactjs còn cung cấp các addon khác, bạn có thể tham khảo tại link bên dưới:

https://facebook.github.io/react/docs/addons.html

Reactjs - Bài 11 - spread attribute

Goal

Giới thiệu spread attribute trong JSX syntax component.

Ví dụ dẫn nhập

Hãy trở lại ví dụ trong bài giới thiệu về props, nhưng hãy để property src đóng vai trò là một I/F của component và bỏ attribute alt đi.

<!DOCTYPE html>
<html>
<head>
  <meta http-equiv='Content-type' content='text/html; charset=utf-8'>
  <title>Basic Example Props</title>
</head>
<body>
  <script src="https://cdnjs.cloudflare.com/ajax/libs/react/0.13.3/react.js"></script>  
  <script src="https://cdnjs.cloudflare.com/ajax/libs/react/0.13.3/JSXTransformer.js"></script>
  <script type="text/jsx">
    var Avatar = React.createClass({
      propTypes: {
        name: React.PropTypes.string.isRequired,
        width: React.PropTypes.number.isRequired,
        height: React.PropTypes.number.isRequired
      },
      render() {
        return (
          <div>
            <img src={this.props.src} width={this.props.width} height={this.props.height}/>
            <span>{this.props.name}</span>
          </div>
        );
      }
    });
    var AvatarEl = <Avatar name="Foo" width={100} height={100} src="http://canime.files.wordpress.com/2010/05/mask-dtb.jpg" />;
    var AvatarComponent = React.render(AvatarEl, document.body);
  </script>
</body>
</html> 

JSX có cung cấp cho ta một syntax gọi là spread operator giúp chúng ta viết ngắn gọn phần return img như sau:

<img src={this.props.src} width={this.props.width} height={this.props.height}/>

thành:

<img {...this.props}/>

... được gọi là spread operator.

Bây giờ, hãy mở JSX Compiler:

https://facebook.github.io/react/jsx-compiler.html

và nhập lần lượt

Cách 1:

<img src={this.props.src} width={this.props.width} height={this.props.height} />

Cách 2:

<img {...this.props}/>

vào phần bên trái, nó sẽ Output ra Javascript lần lượt như sau:

Đối với Cách 1, nó sẽ Output:

React.createElement("img", {src: this.props.src, width: this.props.width, height: this.props.height})

Đối với Cách 2, nó sẽ Output

React.createElement("img", React.__spread({},  this.props))

Bạn có thể thấy là cả 2 cách viết thì nó đều truyền props object vào method React.createElement, điểm khác nhau ở đây là với Cách 2 nếu bạn muốn truyền vào thêm thuộc tính alt cho thì bạn cũng không cần phải add thêm alt={this.props.alt} như trong cách 1. Is it cool?. Bây giờ bạn hãy thực sự dùng cách 2, và bạn có thể thêm alt=”it is cool!” vào đoạn code sau và reload lại page, check view, ¯_(ツ)_/¯ , trong đã có thêm thuộc tính alt

var AvatarEl = <Avatar name="Foo" width={100} height={100} src={"http://canime.files.wordpress.com/2010/05/mask-dtb.jpg"} alt="it is cool!"/>;

spread operator and ES6

spread operator là syntax mới của Javascript trong bộ chuẩn ES6. Nếu bạn muốn tìm hiểu thêm thì link bên dưới sẽ giúp cho bạn:

Bài viết:

https://developer.mozilla.org/en-US/docs/Web/JavaScript/Reference/Operators/Spread_operator

https://babeljs.io/docs/learn-es2015/#default-rest-spread

https://leanpub.com/exploring-es6/read

Tool compile từ ES6 sang Javascript version hiện tại

https://babeljs.io/repl/

Hãy sử dung tool trên để nhập cú pháp có chứa spread operator và xem nó output ra cú pháp js như thế nào.

Reactjs - Bài 10 - vấn đề về performance

Goal

Giới thiệu cấu trúc quan hệ Component và việc re-render lại cấu trúc đó khi có thay đổi.

Stateful Component vs Stateless Component

  • Stateful Component: Component có chứa state (need a memory)
  • Stateless Component: Component không chứa state (no need memory)

Stateful và Stateless Component trong Reactjs

Đặc trưng mô hình trong Reactjs là theo hướng Stateless Component.

Các Component sẽ nhận data từ Component cha, từ đó tạo nên cấu trúc View. Điểm quan trọng ở đây là tự thân Component sẽ không chứa state. Nhờ vào việc output View theo input từ bên ngoài mà việc quản lý, tái sử dụng và testable cho Componennt có thể thực hiện được.

Tất nhiên, nếu tất cả các Component không chứa state thì nó cũng giống như một trang HTML tĩnh nên việc chứa state trong Component là cần thiết nhưng mà nên giảm thiểu những Component như vậy mà cần kết hợp các Stateless Component lại với nhau.

Thông thường thì chỉ có Root Component trong cấu trúc dạng tree mới chứa state và truyền state đó xuống các component con và tạo nên cấu trúc tree.

Khi mà state của Component có sự thay đổi thì tree sẽ tự động tái cấu trúc cho nên không cần phải update lại view một cách thủ công.

Về cơ bản thì ngoài Root Component ra thì không cần phải chứa state cũng OK nhưng mà có những trường hợp cũng phải chứa trạng thái thay đổi do User action

Virtual DOM

Việc chỉ dùng Root Component chứa state và nếu state đó thay đổi thì tái cấu trúc lại toàn bộ View thì đối việc thiết kế rõ ràng sẽ đơn giản nhưng mà chỉ một phần có thay mà toàn bộ DOM tree phải re-render lại thì về mặt performance sẽ rất tệ. Cho nên Reactjs đã đưa Virtual DOM vào trong cấu trúc của mình.

Nói một cách đơn giản thì Virtual DOM là một Javascript Object chứa DOM tree. Trong trường hợp data có thay đổi thì Reactjs sẽ tính diff của Object đó rồi chỉ re-render những Real DOM ở mức tối thiểu nhất.

Trong Reactjs, React.createClass sẽ tạo Component, render() method của Component sẽ return “định nghĩa” Virtual DOM. Virtual DOM được tạo từ React.createElement or bằng syntax JSX

Reactjs Performance

Tham khảo Benchmark dưới đây về kết quả so sánh:

  1. Backbone.js: chỉ render DOM nào có thay đổi
  2. Backbone.js: render toàn bộ DOM nếu có bất cứ thay đổi nào.
  3. React.js: render phần DOM có sự thay đổi thông qua Virtual DOM khi có thay đổi gì.

TodoMVC Benchmark

Theo benchmark thì tốc độ Reactjs sẽ theo thứ tự như sau:

2 (chậm nhất) < 3 < 1 (nhanh nhất) .

Reactjs - Bài 9 - refs và cách tương tác với Browser

Goal

Tìm hiểu về refs trong reactjs và cách tương tác với browser.

Refs and findDOMNode()

Khi chúng ta tạo các component, ‘UI’ trong reactjs, thực ra chúng ta chỉ mới làm việc với faked browser, chứ không phải browser thực sự.

Để tương tác với browser, bạn sẽ cần tham chiếu đến một DOM node. React có method React.findDOMNode(component) mà bạn có thể gọi để có được một sự tham chiếu đến DOM node của component đó.

method findDOMNode() chỉ làm việc trên những component đã được mounted. Nếu bạn dùng nó khi component chưa được mounted, chẳng hạn trong phương thức render() thì sẽ xảy ra lỗi exception.

Chúng ta thử xem ví dụ mà bạn đã làm quen trong bài trước:

<!DOCTYPE html>
<html>
<head>
  <meta http-equiv='Content-type' content='text/html; charset=utf-8'>
  <title>Basic Example Props</title>
</head>
<body>
  <script src="https://cdnjs.cloudflare.com/ajax/libs/react/0.13.3/react.js"></script>  
  <script src="https://cdnjs.cloudflare.com/ajax/libs/react/0.13.3/JSXTransformer.js"></script>
  <script type="text/jsx">

    var Avatar = React.createClass({
      propTypes: {
        name: React.PropTypes.string.isRequired,
        width: React.PropTypes.number.isRequired,
        height: React.PropTypes.number.isRequired
      },

      getInitialState() {
        return {
          src: 'http://canime.files.wordpress.com/2010/05/mask-dtb.jpg'
        };
      },

      onClick() {
        this.setState({src: 'http://38.media.tumblr.com/9f96b52d8fda03c77d0b620d4f12a128/tumblr_n0lvu7fSqE1sont7fo1_500.gif'});
      },

      render() {
        //var src='http://canime.files.wordpress.com/2010/05/mask-dtb.jpg';
        return (
          <div>
            <img src={this.state.src} width={this.props.width} height={this.props.height} alt="alt" />
            <span>{this.props.name}</span>
            <button onClick={this.onClick}>So HOT!!!!</button>
          </div>
        );
      }

    });
    var AvatarEl = <Avatar name="Foo" width={100} height={100}/>;
    var AvatarComponent = React.render(AvatarEl, document.body);
  </script>
</body>
</html>

Bạn hãy mở Developer Tool, và thử in ra AvatarComponent.refs chúng ta sẽ có Object {}, một object rỗng

Bây giờ ta thử thêm ref="avatar" vào trong thẻ như sau:

<img ref="avatar" src={this.state.src} width={this.props.width} height={this.props.height} alt="alt" />

Và bạn lại thử in AvatarComponent.refs, kết quả sẽ là Object {avatar: R…s.c…s.Constructor},

Cách tạo và dùng refs

  1. Thêm attribute ref="myRef" vào thẻ trong thẻ html được trả về từ hàm render.
  2. Bạn có thể access DOM của component trực tiếp bằng cách gọi React.findDOMNode(this.refs.myRef)

More About Refs

Về phần ‘More about refs’, trang chính của Reactjs mô tả khá rõ, phần bên dưới chỉ là phần lược dịch lại theo cách mà tôi đang hiểu.

Hãy tham khảo link More About Refs

Như những bài trước đã giới thiệu, chúng ta config và quản lý state (trạng thái) Component thông qua stateprops. Mỗi khi có sự thay đổi của stateprops thì chúng ta Component đó đều render lại. Việc data thay đổi thông qua stateprops được gọi là React data flow. React data flow luôn đảm bảo hầu hết props mà được truyền cho children đều được output từ method render(). Cho nên việc tương tác UI phần lớn là thông qua props hay state, tuy nhiên có một vài trường hợp mà bạn cần tương tác với UI sau khi render. Ví dụ như khi bạn muốn dùng jQuery plugin trong ứng dụng của mình. Hay như bạn muốn element được focus sau khi bạn update giá trị của nó thành empty string ”.

Tham khảo Completing the Example

  • Một lưu ý nhỏ cho Reactjs newbie: Cố gắng nắm vững và thực hành nhiều với stateprops trước khi dùng refs, thường thì React data flow sẽ giải quyết được hết mục đích của bạn.

Reactjs - Bài 8 - Event

Goal

Giới thiệu event trong Reactjs

SyntheticEvent (Event hợp nhất)

Giống như việc Reactjs wrap DOM thành các VirtualDOM thì Reactjs cũng wrap DOM event thành các SyntheticEvent dùng chung cho các Browsers.
I/F
boolean bubbles
boolean cancelable
DOMEventTarget currentTarget
boolean defaultPrevented
number eventPhase
boolean isTrusted
DOMEvent nativeEvent
void preventDefault()
void stopPropagation()
DOMEventTarget target
number timeStamp
string type
Theo đó, chúng ta có thể sử dụng các event preventDefault, stopPropagation hay target như hồi giờ.
Từ Reactjs v0.12 thì không dùng cách return false ở event handler để stop event propagation. Thay vào đó chúng ta dùng e.stopPropagation() or e.preventDefault() để thực hiện

Event handler

Trong bài trước, chúng ta đã có đụng đến event của Reactjs, ta thử nêu lại ở đây:
    var Avatar = React.createClass({
      propTypes: {
        name: React.PropTypes.string.isRequired,
        width: React.PropTypes.number.isRequired,
        height: React.PropTypes.number.isRequired
      },

      getInitialState() {
        return {
          //src: 'http://canime.files.wordpress.com/2010/05/mask-dtb.jpg'
          src: this.props.src
        };
      },
      // event handler
      onClick() {
        this.setState({src: 'http://38.media.tumblr.com/9f96b52d8fda03c77d0b620d4f12a128/tumblr_n0lvu7fSqE1sont7fo1_500.gif'});
      },

      render() {
        //var src='http://canime.files.wordpress.com/2010/05/mask-dtb.jpg';
        return (
          <div>
            <img  src={this.state.src} width={this.props.width} height={this.props.height} alt="alt" />
            <span>{this.props.name}</span>
            <button onClick={this.onClick}>So HOT!!!!</button>
          </div>
        );
      }

    });
onClick={this.onClick} : bind event click với event handler là onClick. Bên trong onClick, Reactjs bind this với Component instance cho nên chúng ta không cần phải ‘bind’ this vào event handler như kiểu: onClick(e) {...}.bind(this).

Not provided event

Đối với các event mà Reactjs support thì cứ sử dụng bình thường nhưng mà đối với event resize của window hay như các event riêng của jQuery plugin thì chúng ta:
  1. Sử dụng addEventListener trong method componentDidMount() để đăng ký event.
  2. Và dùng removeEventListener trong method componentWillUnmount để remove event.
    Tham khảo:
    http://facebook.github.io/react/tips/dom-event-listeners.html

Reactjs - Bài 7 - component lifecyle là gì ?

Goal

Hiểu về life cycle của Component

Ví dụ dẫn nhập

<!DOCTYPE html>
<html>
<head>
  <meta http-equiv='Content-type' content='text/html; charset=utf-8'>
  <title>Basic Example Props</title>
</head>
<body>
  <script src="https://cdnjs.cloudflare.com/ajax/libs/react/0.13.3/react.js"></script>  
  <script src="https://cdnjs.cloudflare.com/ajax/libs/react/0.13.3/JSXTransformer.js"></script>
  <script src="https://cdnjs.cloudflare.com/ajax/libs/superagent/0.15.7/superagent.min.js"></script>
  <script type="text/jsx">

    var Avatar = React.createClass({
      propTypes: {
        id: React.PropTypes.string.isRequired,
        name: React.PropTypes.string.isRequired,
        width: React.PropTypes.number.isRequired,
        height: React.PropTypes.number.isRequired,
        initialLike: React.PropTypes.bool.isRequired,
        // Thêm Interface onDelete()
        onDelete: React.PropTypes.func.isRequired,
      },
      getInitialState() {
        return {
          liked: this.props.initialLike
        };
      },
      onClick() {
        this.setState({liked: !this.state.liked});
      },
      // Ủy quyền cho Component cha xử lý.
      _onDelete() {
        this.props.onDelete(this.props.id);
      },
      render() {
        var textLike = this.state.liked ? 'like' : 'haven\'t liked';
        return (
          <li key={this.props.id}>
            <span>{this.props.id}</span>
            <img  src={this.props.src} width={this.props.width} height={this.props.height} alt="alt" />
            <span>{this.props.name}</span>
            <button onClick={this.onClick}>{textLike}</button>
            <button onClick={this._onDelete}>Delete</button>
          </li>
        );
    }
    });
    var request = window.superagent;
    var Avatars = React.createClass({

      getInitialState() {
        return {
          avatars: [
            {id: 1, name: "Avatar 1", height: 100, width: 100, like: false, src: "http://canime.files.wordpress.com/2010/05/mask-dtb.jpg"},
            {id: 2, name: "Avatar 2", height: 100, width: 100, like: true, src: "http://z4.ifrm.com/30544/116/0/a3359905/avatar-3359905.jpg"},
            {id: 3, name: "Avatar 3", height: 100, width: 100, like: false, src: "http://www.dodaj.rs/f/O/IM/OxPONIh/134.jpg"}
          ]
        }
      },
      // Thêm method deleteItem() set lại State (chứa các Component con) cho Component cha này
      deleteItem(id) {
        this.setState({
          avatars: this.state.avatars.filter(function(avatar){
            return avatar.id !== id;
          })
        });
      },
      componentDidMount: function() {
        var self = this;
        request.get('http://localhost:3000/api/employees', function(res) {
        console.log(res);
          self.setState({avatars: res.body});
        });
      },

      render() {  
        var avatars = this.state.avatars.map(function(avatar){
        // use below solution
        // map(function(){},this) 
        // or map(function(){}.bind(this)) 
        // or var that = this; onDelete = {that.deleteUser}
        // to pass this value to map function.
        // bind onDelete (event) to deleteUser.
          return <Avatar onDelete={this.deleteItem} id={avatar.id} name={avatar.name} width={avatar.width} height={avatar.height} src={avatar.src} initialLike={avatar.like} />;
        }, this);
        return (
          <ul>
            {avatars}
          </ul>
        );
      }
    });
    var AvatarsComponent = React.render(<Avatars />, document.body);
  </script>
</body>
</html>
Trong ví dụ trên, tôi có đưa thêm vào một method là componentDidMount(). Trong phương thức này tôi sẽ lấy dữ liệu từ server lên và change state của Component là avatars. Method componentDidMount() là nằm trong LifeCycle của Component.
  • Trong ví dụ trên, tôi có dùng:
    1. superagentjs để thay cho jQuery Ajax
    2. loopback để tạo api server.
      (Bạn có thể dùng json server để có thể tạo một Mock API server đơn giản hơn)

Tham khảo

Link dưới đây minh họa khá rõ về Life Cycle của Component. Mời các bạn tham khảo.
http://javascript.tutorialhorizon.com/2014/09/13/execution-sequence-of-a-react-components-lifecycle-methods/

Reactjs - Bài 6 - mối quan hệ giữa props và state

Goal

Giới thiệu mối quan hệ của propsstate trong Reactjs

props là IF, state là trạng thái của Component.

  • state có nghĩa là ‘Trạng thái’. Từ bây giờ chúng ta mặc định dùng ‘state’ để chỉ trạng thái của Component.
Hãy xem xét ví dụ sau:
<!DOCTYPE html>
<html>
<head>
  <meta http-equiv='Content-type' content='text/html; charset=utf-8'>
  <title>Basic Example Props</title>
</head>
<body>
  <script src="https://cdnjs.cloudflare.com/ajax/libs/react/0.13.3/react.js"></script>  
  <script src="https://cdnjs.cloudflare.com/ajax/libs/react/0.13.3/JSXTransformer.js"></script>
  <script type="text/jsx">

    var Avatar = React.createClass({
      propTypes: {
        name: React.PropTypes.string.isRequired,
        width: React.PropTypes.number.isRequired,
        height: React.PropTypes.number.isRequired,
        like: React.PropTypes.bool.isRequired,
      },

      getInitialState() {
        return {
          liked: this.props.like
        };
      },

      onClick() {
        this.setState({liked: !this.state.liked});
      },

      render() {
        var textLike = this.state.liked ? 'like' : 'haven\'t liked';
        return (
          <div>
            <img  src={this.props.src} width={this.props.width} height={this.props.height} alt="alt" />
            <span>{this.props.name}</span>
            <button onClick={this.onClick}>{textLike}</button>
          </div>
        );
      }

    });

    var AvatarEl = <Avatar 
                      name="Foo" 
                      width={100} 
                      height={100} 
                      src='http://canime.files.wordpress.com/2010/05/mask-dtb.jpg' 
                      like={false}
                      />;

    var AvatarComponent = React.render(AvatarEl, document.body);
  </script>
</body>
</html>
Ví dụ trên được biên tập từ ví dụ trong bài trước nhưng có một số thay đổi như sau:
  1. image source không còn được xem như là state của Component Avatar nữa.
  2. state của Component là like.
  3. like có kiểu dữ liệu là boolean.
  4. Giá trị liked (của state) được truyền và gán vào ở method getInitialState().
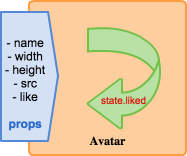
Chúng ta có thể config Avatar thông qua props của nó như là name, width, height, src, like. Còn khi trạng thái của nút button thì được chứa trong state. Hình bên dưới sẽ minh họa rõ hơn về điều này:
props-state-01
Bây giờ bạn hãy chạy source code trên và thử click vào button, bạn sẽ thấy text của button thay đổi. Như vậy bên trong Component được quản lý bởi state còn props chỉ dùng để ‘config’.
Khi thiết kế Component, thì trước hết hãy thiết kế Prop như là I/F, rồi định nghĩa những giá trị có thay đổi mà Component quản lý như là State.

Props in getInitialState Is an Anti-Pattern

Sử dụng props truyền vào để khởi tại state trong getInitialState thường dẫn đến việc duplication của nguyên tắc Source Of Truth nữa, sẽ không biết là dữ liệu thực sự thì ở đâu. Việc này khiến cho chương trình lúc nào cũng phải compute value on-the-fly để đảm bảo dữ liệu không mất sự đồng bộ và gây nên vấn đề trong việc bảo trì.
Hãy xem lại ví dụ trên:
      getInitialState() {
        return {
          liked: this.props.like
        };
      },
    var AvatarEl = <Avatar 
                      name="Foo" 
                      width={100} 
                      height={100} 
                      src='http://canime.files.wordpress.com/2010/05/mask-dtb.jpg' 
                      like={false}
                      />;
Mặc dù tôi đã cố tình dùng like cho propsliked cho state, nhưng nó vẫn có khả năng nhầm lẫn.
Tuy nhiên, nó sẽ không phải là một anti-pattern nếu bạn làm rõ việc synchronization không phải là mục tiêu ở đây:
      getInitialState() {
        return {
           // naming it initialX clearly indicates that the only purpose
           // of the passed down prop is to initialize something internally
          liked: this.props.initialLike
        };
      },
    var AvatarEl = <Avatar 
                      name="Foo" 
                      width={100} 
                      height={100} 
                      src='http://canime.files.wordpress.com/2010/05/mask-dtb.jpg' 
                      initialLike={false}
Thao khảo thêm bài viết về điều này tại đây

Using State in parent, Prop as I/F for children.

Qua các ví dụ trên, chúng ta đã có một Component Avatar có chứa các thuộc tính như name, width, height, src, like (button like thì thực ra chúng ta nên tách nó ra thành một Component hoàn chỉnh). Trong thực tế, thông thường chúng ta sẽ có một list các Component. Hãy xem thử cấu trúc sau:
  • Avatar List
    • Avatar
      • name
      • height
      • width
      • src
      • initialLike
    • Avatar
      • name
      • height
      • width
      • src
      • initialLike
    • Avatar
      • name
      • height
      • width
      • src
      • initialLike
Ta xem Avatar List ở đây như làm một Component cha, còn Avatar là một Component con. Component cha sẽ truyền các giá trị vào Component con thông qua I/F props của Component con.
Chúng ta thử refactor code ở phần trước để minh họa cho điều này như sau:
<!DOCTYPE html>
<html>
<head>
  <meta http-equiv='Content-type' content='text/html; charset=utf-8'>
  <title>Basic Example Props</title>
</head>
<body>
  <script src="https://cdnjs.cloudflare.com/ajax/libs/react/0.13.3/react.js"></script>  
  <script src="https://cdnjs.cloudflare.com/ajax/libs/react/0.13.3/JSXTransformer.js"></script>
  <script type="text/jsx">

    var Avatar = React.createClass({
      propTypes: {
        name: React.PropTypes.string.isRequired,
        width: React.PropTypes.number.isRequired,
        height: React.PropTypes.number.isRequired,
        initialLike: React.PropTypes.bool.isRequired,
      },

      getInitialState() {
        return {
          liked: this.props.initialLike
        };
      },

      onClick() {
        this.setState({liked: !this.state.liked});
      },

      render() {
        var textLike = this.state.liked ? 'like' : 'haven\'t liked';
        return (
          <li>
            <img  src={this.props.src} width={this.props.width} height={this.props.height} alt="alt" />
            <span>{this.props.name}</span>
            <button onClick={this.onClick}>{textLike}</button>
          </li>
        );
      }

    });

    var Avatars = React.createClass({

      getInitialState() {
        return {
          avatars: [
            {name: "Avatar 1", height: 100, width: 100, initialLike: false, src: "http://canime.files.wordpress.com/2010/05/mask-dtb.jpg"},
            {name: "Avatar 2", height: 100, width: 100, initialLike: true, src: "http://z4.ifrm.com/30544/116/0/a3359905/avatar-3359905.jpg"},
            {name: "Avatar 3", height: 100, width: 100, initialLike: false, src: "http://www.dodaj.rs/f/O/IM/OxPONIh/134.jpg"}
          ]
        }
      },

      render() {  
        var avatars = this.state.avatars.map(function(avatar){
        var AvatarEl = <Avatar 
                      name={avatar.name}
                      width={avatar.width}
                      height={avatar.height}
                      src={avatar.src} 
                      initialLike={avatar.initialLike}
                      />;
          return AvatarEl;
        });
        return (
          <ul>
            {avatars}
          </ul>
        );
      }

    });

    var AvatarsComponent = React.render(<Avatars />, document.body);

  </script>
</body>
</html>
Vì để thấy được sự chuyển tiếp từ phần trước, cũng như cho mọi người dễ hình dung hơn về mối quan hệ cha-con, cho nên chuyển đoạn var AvatarEl ở ví dụ trước vào trong Component Avatars. Tuy nhiên trong thực tế thì phần source code đó, có thể viết gọn hơn như sau:
return <Avatar name={avatar.name} width={avatar.width} height={avatar.height} src={avatar.src}initialLike={avatar.initialLike} />;

Component cha handling event của Component con

Trong dạng list, chúng ta thường hay có các action như thêm item, sửa item, và xóa item. Bây giờ ta thử thêm chức năng xóa item. Khi xóa Component con thì list Component sẽ thay đổi, việc thay đổi này sẽ update lại list Component. Như vậy ở đây, chúng ta thấy một logic như sau:
- Click button delete trên Component con.
- Component con phát sự kiện delete lên Component cha.
- Component cha update lại list.
Source code:
<!DOCTYPE html>
<html>
<head>
  <meta http-equiv='Content-type' content='text/html; charset=utf-8'>
  <title>Basic Example Props</title>
</head>
<body>
  <script src="https://cdnjs.cloudflare.com/ajax/libs/react/0.13.3/react.js"></script>  
  <script src="https://cdnjs.cloudflare.com/ajax/libs/react/0.13.3/JSXTransformer.js"></script>
  <script type="text/jsx">

    var Avatar = React.createClass({
      propTypes: {
        id: React.PropTypes.number.isRequired,
        name: React.PropTypes.string.isRequired,
        width: React.PropTypes.number.isRequired,
        height: React.PropTypes.number.isRequired,
        initialLike: React.PropTypes.bool.isRequired,
        // Thêm Interface onDelete()
        onDelete: React.PropTypes.func.isRequired,
      },
      getInitialState() {
        return {
          liked: this.props.initialLike
        };
      },
      onClick() {
        this.setState({liked: !this.state.liked});
      },
      // Ủy quyền cho Component cha xử lý.
      _onDelete() {
        this.props.onDelete(this.props.id);
      },
      render() {
        var textLike = this.state.liked ? 'like' : 'haven\'t liked';
        return (
          <li key={this.props.id}>
            <span>{this.props.id}</span>
            <img  src={this.props.src} width={this.props.width} height={this.props.height} alt="alt" />
            <span>{this.props.name}</span>
            <button onClick={this.onClick}>{textLike}</button>
            <button onClick={this._onDelete}>Delete</button>
          </li>
        );
    }
    });
    var Avatars = React.createClass({

      getInitialState() {
        return {
          avatars: [
            {id: 1, name: "Avatar 1", height: 100, width: 100, initialLike: false, src: "http://canime.files.wordpress.com/2010/05/mask-dtb.jpg"},
            {id: 2, name: "Avatar 2", height: 100, width: 100, initialLike: true, src: "http://z4.ifrm.com/30544/116/0/a3359905/avatar-3359905.jpg"},
            {id: 3, name: "Avatar 3", height: 100, width: 100, initialLike: false, src: "http://www.dodaj.rs/f/O/IM/OxPONIh/134.jpg"}
          ]
        }
      },
      // Thêm method deleteItem() set lại State (chứa các Component con) cho Component cha này
      deleteItem(id) {
        this.setState({
          avatars: this.state.avatars.filter(function(avatar){
            return avatar.id !== id;
          })
        });
      },

      render() {  
        var avatars = this.state.avatars.map(function(avatar){
        // use below solution
        // map(function(){},this) 
        // or map(function(){}.bind(this)) 
        // or var that = this; onDelete = {that.deleteUser}
        // to pass this value to map function.
        // bind onDelete (event) to deleteUser.
          return <Avatar onDelete={this.deleteItem} id={avatar.id} name={avatar.name} width={avatar.width} height={avatar.height} src={avatar.src} initialLike={avatar.initialLike} />;
        }, this);
        return (
          <ul>
            {avatars}
          </ul>
        );
      }
    });
    var AvatarsComponent = React.render(<Avatars />, document.body);
  </script>
</body>
</html>
Hình bên dưới sẽ giúp bạn hiểu rõ hơn về mối quan hệ giữa event của Component con và Component cha.
props-event-state
Khi user click vào button Delete, gọi đến onDelete method Interface đã được binding với method deleteItem() ở Component cha. Việc update lại list Component sẽ được xử lý trong method này.